Tuesday 7 April 2009

A ruddery repair - part 4 (final part)

Putting the rudder back on was a lot easier than taking it off. With the stern bearing out of the way, it slid into the rudder tube effortlessly. After rebuilding the surround and refitting the stern bearing, quite a lot of buggering about with the greaser tube for the stern bearing, refitting the prop shaft, reassembling the prop, and some filling, fairing and antifouling, it looked like this:


At the same time, all the usual maintenance was ongoing. Harbour mud stains were removed from the topsides with oxalic acid. The shine was restored with rubbing compound and sealed in with 2 coats of wax. Toe rails scraped, sanded and oiled (not quite finished yet). Hull washed, rubbed down and antifouled - 2 coats, British racing green.


How sexy is that?

We launched on Saturday the 4th of April. It'll still be a few weeks before we're ready to sail, mind you. The mast and boom are to be repainted before we put the rig back on and the new instruments are still to be fitted. The new sails should be delivered later this week (very exciting).
Then, by God, we're going to go sailing.

A ruddery repair - part 3

Next up was the reinstatement of the pivot tang. Simply bonding it back in place seemed unwise, as this was clearly the weak point of the rudder in the first place (though, to be fair, it did last for 40 years). I decided to through-bolt it with a stainless steel backing plate either side (kindly fabricated by Robin in his Broomhouse Workshop [garden shed]).

This was done with plenty of resin in place and everything left clamped and tight for a day to set up.


Three layers of glass cloth were then bonded right around the base of the rudder, to eliminate the weakness along the seam where the two halves were stuck together back in '67 (or thereabouts). After fairing and smoothing, I applied a couple of coats of unthickened epoxy resin for a nice smooth finish.

Finally, I filled the hollow interior of the rudder with 2-part polyurethane buoyancy foam (see this site for a hilarious cautionary tale about the use of this stuff). Said cavity was completely full of water when we took the rudder off (about 6 or 7 litres). I bored two rows of holes (8 in total) across the cavity and then poured small batches of foam into them in sequence. 50 ml at a time, with an expansion ratio of 20:1!


A ruddery repair - part 2

The first order of business was to make good the bit at the top of the rudder that I'd had to grind off. This called for many (around a dozen) layers of double-thickness glass cloth, bonded in with epoxy resin, plus a bit of fairing filler here and there to perfect the shape. My aim was to get things looking exactly as they had before being attacked with the grinder.

Battle commences - all the materials laid out ready...


The first layers of glass fibre go on.


Building it up - addition of some thickener to the resin helps to reach the right profile.


Looks precarious, but it made sense for the next stage of the repair...

A ruddery repair - part 1

The story of the Fettler continues...
Winter is over and the last few weeks leading up to lift-in have been characterised by feverish preparations. The big one was the unexpected job that came to light after lift-out last autumn, when I noticed a nasty looking crack at the bottom end of the rudder. There was some debate during the winter over whether it would be necessary to take the rudder off in order to make a proper repair. Actually, that's not quite true. It was obvious that the rudder would have to come off. The problem was that the rudder can only come off when the boat is 5 or 6 feet up in the air.
Facilities in our harbour don't stretch to a resident crane or travel hoist, so lifting boats, apart from when the big crane is hired for lifting everybody out or in, is quite a challenge.
I eventually managed to sort out the hire of a big machine to come and lift the boat up twice - once for taking the rudder off, and again a few weeks later to put it back on, leaving 1 week to get everything back together for lift-in.


This was the way the damage at the base of the rudder looked, after some cleaning up with the grinder. You can see the stainless steel tang, that had originally been bonded in place, sitting on top of the rudder. That's the part on which the rudder pivots. It simply dropped out when we removed the rudder and that was when I knew that this repair was worth all the hassle.


We thought that dropping the rudder would be fairly straightforward, once the propeller and prop shaft were removed. Sadly, it was not to be. No way, no how would the rudder shaft clear the outer end of the stern bearing (the bit where the prop shaft passes through the hull). I had to act quickly, so grabbed the grinder out of the back of the van and ground the glass away from the top end of the rudder, right down to the shaft. This allowed us to remove the rudder, but at the expense of a bent flange on the stern bearing (luckily Robin, fellow club member and retired engineer, had the kit and expertise to straighten this out without fuss).


The rudder came home with us on the top of the van and the spare bedroom became the workshop.
Back at the yard, the vessel was left rudderless for the first time in many, many years.
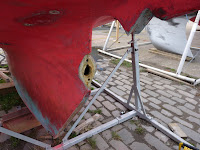